![94682b08-af4e-42f2-b868-af7439511c70.jpg]](https://support.growdata.com.au/hs-fs/hubfs/94682b08-af4e-42f2-b868-af7439511c70.jpg?height=50&name=94682b08-af4e-42f2-b868-af7439511c70.jpg)
By default, GrowData will assume you just have the one shed. If you've got multiple, please let our Grower Success team know and we can apply the customisation for you to be able to manage inventory in multiple sheds.
Once the 'multiple sheds' module is applied, here's how to use it:
1. Setup your sheds. In the Setup menu, click on Sheds and enter the variations on the list.
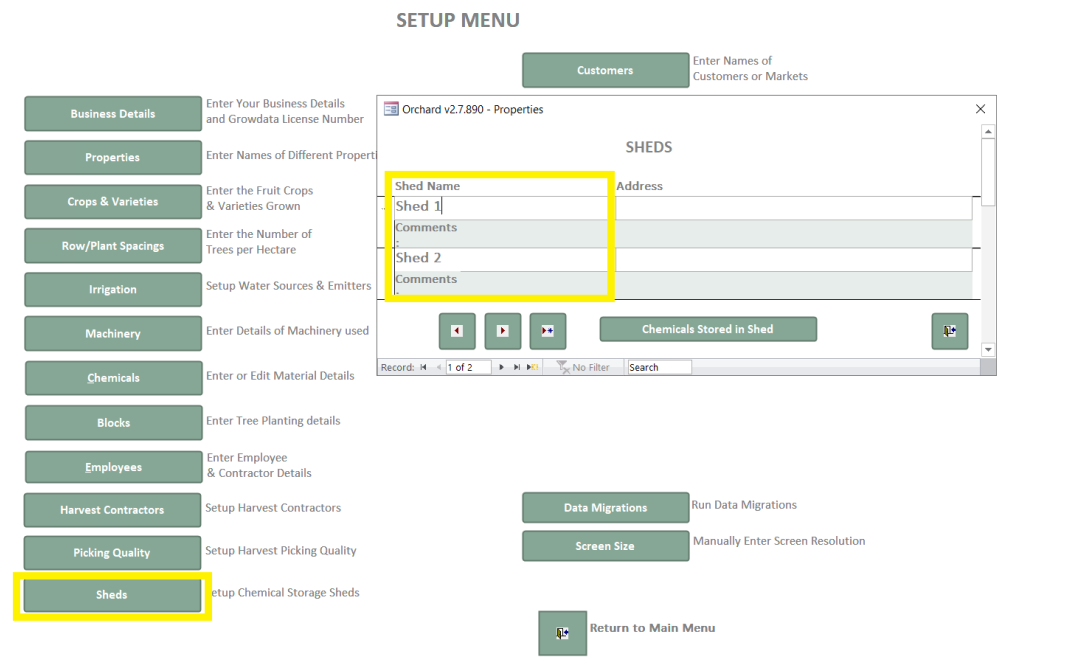
As part of this setup, need to identify which chemicals are going to be stored in each shed for stocktake purposes. You can do this via the setup screen, or, in Enter Data, Inventory. Select the shed and then click 'Chemicals Stored in Shed'.

Your list of Chemicals will appear. You can either select chems individually, or use the select/clear all options on the right hand side. Once complete, select the back door icon in bottom right corner of the window.

2. Complete a Stock Take for each shed to balance out your stock levels. In Enter Data > Inventory, select the shed you're doing the stocktake for, then select 'Recalculate Stock Levels'.

Click 'Recalculate Stock Levels'. You'll see all of your chemicals and fertilisers appear on the right hand side with the quantities GrowData thinks are on hand (based on what's come IN through Purchases, and what's gone OUT via usage in block applications).
You'll also now be able to click on 'Preview Current Stock List' and Print this out.
This page can then be taken to the chemical/fert shed to do the physical counts. It's important to count quantities in Litres/ Kg's (not containers). For example, 5 and a half drums of roundup (20 litres per drum) should be written down as 110 litres.
Note: It's important to ensure you've finished your physical count before you start to enter the quantities into GrowData.
See example below where physical counts have been handwritten on the sheet:

Now that you've completed the physical count, back in the GrowData program, click on 'Enter Stock Take', and enter the physical amounts for each chemical. Put a zero against anything with no stock on hand.

Check the date of the stock take is correct, and adjust this if necessary. Then, select 'commit stock take'.
Your stock take is now complete, and your quantities on hand will reflect what you have entered. You'll now need to repeat this for the other shed.

3. Use Chemicals and Fertilisers from a particular shed
When you create a Spray Diary, Fertigation or Dry Application, you will now see a field for selecting the Shed. This is so the system knows where to decrement your inventory from behind the scenes. You must select this every time you complete an activity.

4. Reporting on inventory per 'shed'
In the Reports menu, click on Inventory and you'll now see the 'Shed' dropdown appear. There's a variety of reports available in here, including current stock balances, previous stock take records, and usage per shed.
