![94682b08-af4e-42f2-b868-af7439511c70.jpg]](https://support.growdata.com.au/hs-fs/hubfs/94682b08-af4e-42f2-b868-af7439511c70.jpg?height=50&name=94682b08-af4e-42f2-b868-af7439511c70.jpg)
This daily workflow guide will allow you to record the following information for each box:
- Date picked
- Type of box
- Which block it came from
- Who picked it
- $ Rate per box
Subsequently, by recording this for each box you'll collect data which tells you:
- Harvest Records by Block and/or Date
- Picker performance reports
- Harvest costs
Create Picker Stickers
Step A: Open your GrowData Program
On your computer/laptop which has barcode printing software installed, open up the regular GrowData RDP.

Step B: Select your Pickers for the day
Once you've logged in and can see the main dashboard, go to Setup > Employees > Pickers.
Scenario 1: Existing Pickers
If the individual Pickers have already been set up, skip straight to Step C.
Scenario 2: New Pickers
If you've got new pickers, you'll need to set them up with their first name, surname and barcode number. Additional steps on how to setup Pickers can be found in article 1.10 Employees & Pickers Setup.
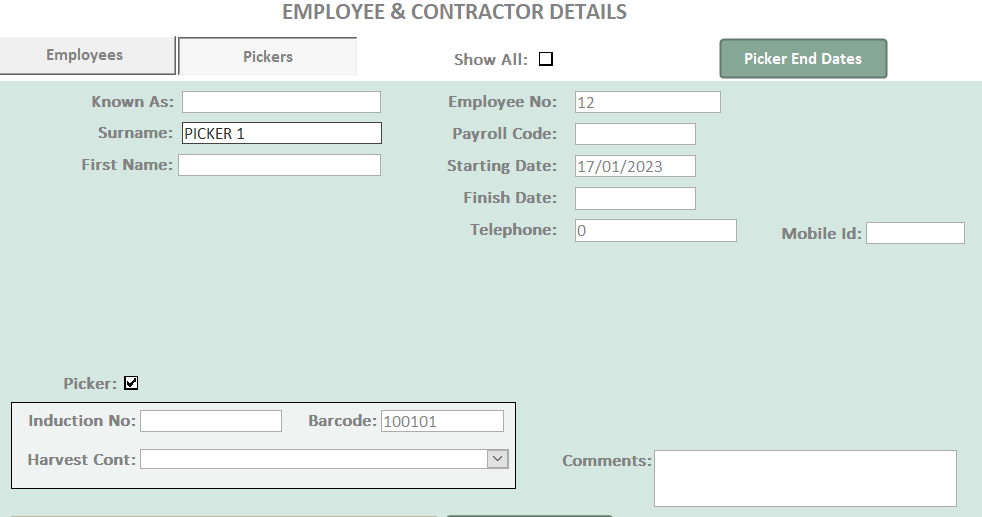
Scenario 3: You don't yet know who the individual Pickers will be
In this scenario, simply set up generic pickers and fill in the individuals details at the end of the day. In the example below, I have created a picker called 'PICKER 1', and assigned them barcode #100101.
If the Harvest Contractor is known, select this from the dropdown list below the Barcode field. (If it's not on the list, you may need to complete in the setup. Steps on how to do this can be found in article 1.09 Harvest Contractors Setup)
The trick with this scenario, is to make note of who-had-what so that you can come back in and rename to the individual's correct details at the end of the day. We recommend noting this down by associating an individual with the Surname or the Employee No (not the Barcode, because this can change from day to day).
E.g. 'Picker 1' = 'Jane Smith', or, Employee '#12' = 'Jane Smith'
Step C: Generate Picker List for Printing Stickers
On the Picker page, select Picker List (List for Label Printing)

Within the window above:
- Highlight the pickers from your 'Available Pickers' list on the left, then use the arrows in the middle to move them across into the 'Picker List' on the right. Essentially, this is creating the list of people who we want barcode stickers created for today.
- In the 'LabelsPerEmployee' field, enter the number of stickers you wish to print for each individual.
- Select 'Export'. This will save the list as a .csv to your Barcodes folder (within your C Drive > GrowData folder).
Step D: Print Picker Stickers
Open up your barcode printing software and print the labels.
Note: The first time you do this using GrowData, you'll need to point your barcode software to the .csv list you just created in Growdata (depending on your software, there's usually a database icon which is where you will do this).
Please also note, whilst we are here to support your entire GrowData experience, every Grower has different hardware/software on site, therefore we recommend having a manual handy or reaching out to your supplier for support with any potential troubleshooting along the way. We also recommend using BarTender for your barcode software as we are familiar with this program and can provide you with a picker sticker template if required.
Scan Boxes Into the Shed:
Step A: Open your Stock Receivals Program
On your computer/laptop stationed in the packing shed, open up the GrowData Stock Receivals RDP.
Step B: Make Selections
Once the program has opened and you see the Stock Receival screen, you'll need to make a few selections before you can start scanning. In the image below, yellow represents selections you'll need to make on a daily basis, and red represents selections that may change throughout the day depending on what's coming into the shed. 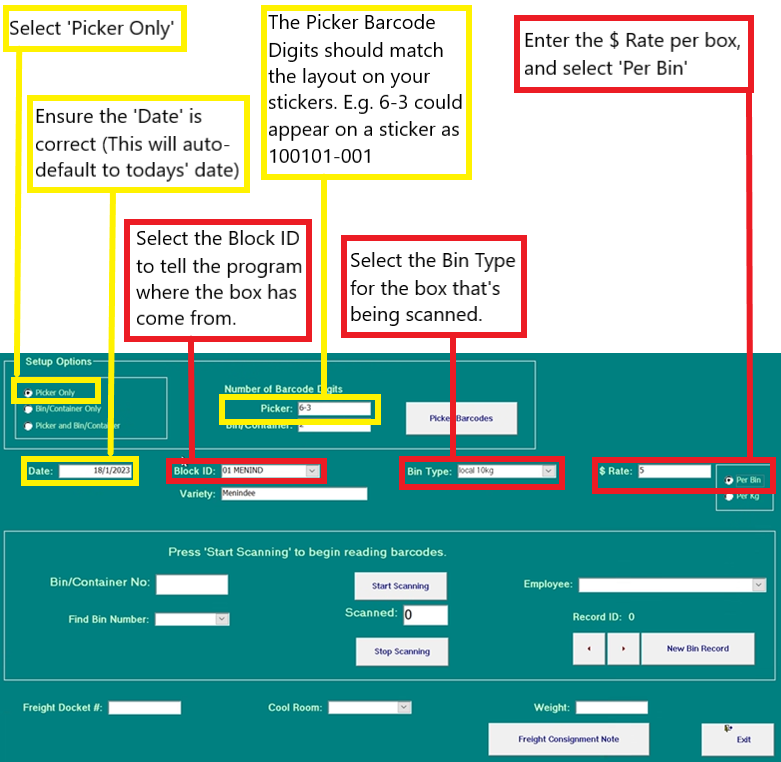
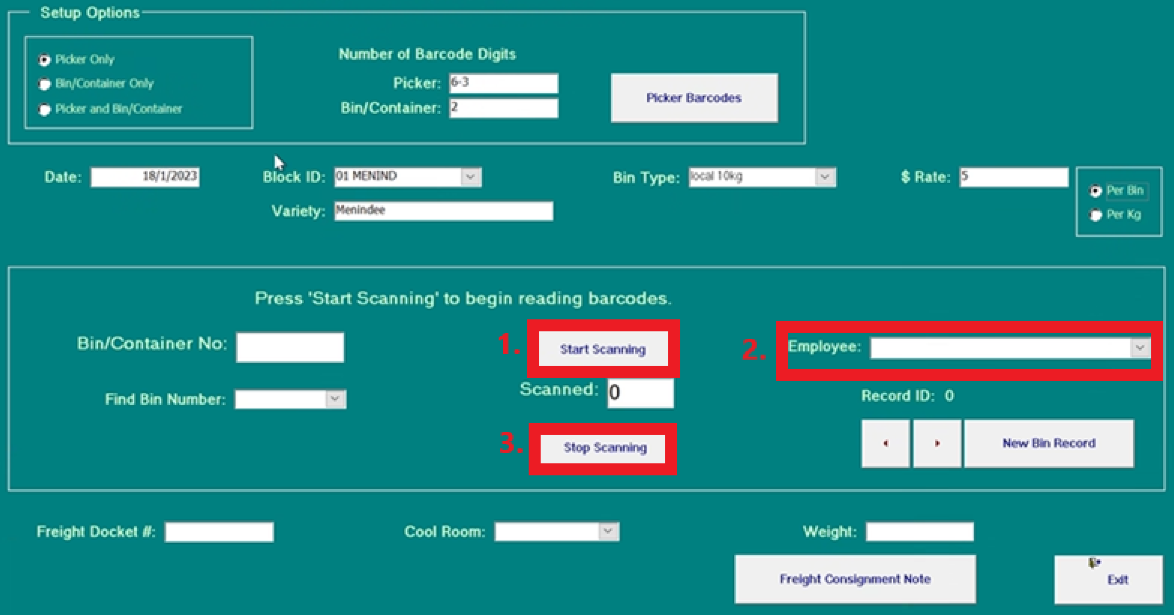
Step C: Ready to Scan
Now that you've made the appropriate selections, ensure your handheld scanner is connected and complete the following:
1. Select 'Start Scanning'
2. Click into the 'Employee' field with your mouse cursor and use your Scanner to read the picker sticker barcodes on the boxes. Whilst the selections remain the same, you can now continue to scan multiple boxes in. Just remember to change the selections if stock is coming in from a different block, bin type/rate etc.
3. Select 'Stop Scanning' when you've finished for the day. When you're ready to close the program, select 'Exit' in the bottom right.
Note: as you start to scan multiple boxes, you'll see the record ID will move forward with each scan. If the same barcode is accidentally scanned twice, the system will recognise it as a duplicate and it will not add to the scanned count (or create a harvest record). Example below:

Once scanned into the Stock Receivals program, any scan records will automatically flow through the Orchard Program>Enter Data>Harvest screen.